Super Simple Deck Design
Sep 27, 2022
First: Please guys, consult your local planning department before finalizing any deck plan.
Here's one of my rules of thumb:
If the deck isn't at least 18" above grade, it might as well be a patio.
Here's why:
The enemies of wood (even pressure treated) are dirt and moisture. Ideally, you'd keep all wood 6" away from any soil or moisture... and grade away from it. Then, yes, you could opt out of either posts and/or joists and just put decking on beams on footings... but it's really not the best way to go as there's no way to access under the deck AND it tends to stay moist under such a low deck. AND many planning departments require 12" of clearance between grade and beams and/or 18" of clearance between grade and joists.
... so at least we got that out of the way. (I've had lots of folks want me to design a deck that's a step or two off the ground over the years and it just doesn't make sense -and usually is not allowed.)
That leaves us with the basic parts of a typical deck:
- Footings
- Posts
- Beams
- Headers, Ledgers, Joists, and Blocking
- Decking
- Railings
Let's look at each of these and discuss some rules of thumb for each:
Footings:
- Footings are usually concrete. If necessary, specify not less than 2,500 psi compressive strength.
- Footings must be at least 6" thick and at least 12" wide*.
- Footings must be located at least 12" below undisturbed soil.
- Footings behind a retaining wall must be set back by at least the height of the retaining wall -or dug equally as deep.
- Sometimes called "Piers".
*Actual footing size is determined by the beam and joist spans along with "dead load" (10 lbs/sq. ft.) and "Live Load" (40 lbs/sq. ft.). -If you want to put a spa on it, it should be engineered to accommodate the extra load! Rule of thumb: add up 1.5x the live load PLUS the dead load.
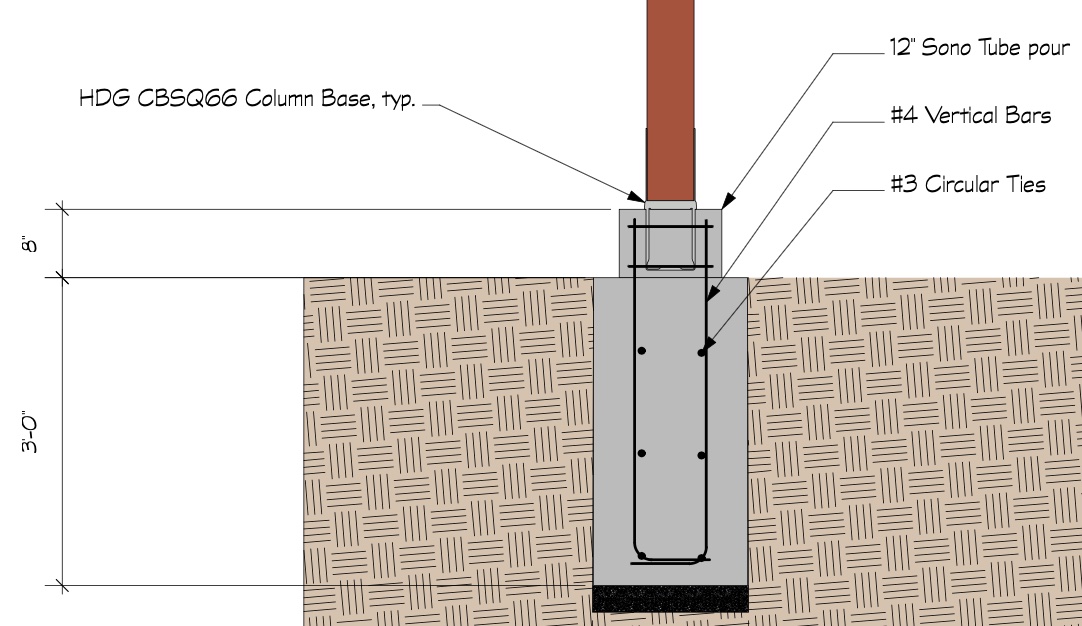
I LOVE rules of thumb and assuming the worst: heavy loads, less stable soils. For this reason, if there's any question of stability I like to specify piers 18" in diameter and 3' deep with a 12" sono tube extension on top for the post base hardware. This is suitable for a 2nd story deck with a 6x6 post.
Posts:
Pretty simple here... We're talking class 2 Pressure Treated Douglas Fir and it's usually either a 4x4 or a 6x6. Ok, maybe 4x8.
Here's the rule of thumb:
- 4x4 posts: up to 6'9" to bottom of beam
- 4x8 posts: up to 8' to bottom of beam
- 6x6 posts: up to 14' to bottom of beam
- If you're designing a deck where the beams are more than 14' off the ground you should have an engineer work out the details.
This brings us to FASTENERS! -a term I loosely apply to all connection parts
The easiest thing to do, and what most planning departments expect, is to use the standard: Simpson StrongTie fasteners.
In particular, the fastener to use between the footing and the bottom of the post is called a Column Base.
likewise the fastener to use between the footing and the Beam is called a Column Cap.
Post Bracing (Also called Knee Bracing or Diagonal Sway Bracing): The Rule of Thumb here is that there should be a minimum of two braces in each direction. These should be a minimum of 24" from the center of the beam down the post, at a 45° angle, and secured with HDG (hot-dipped galvanized) 1/2" hardware (bolts or lag screws). Usually 4x4, 4x6 or 4x8.
Beams:
Also called "Girders".
Beams are the larger timbers on top of the posts that hold up the joists.
The rule of thumb I've always used for sizing the beams is easy to remember and allows a bit of safety built-in. (I'll use this for joists too!): Super Simple: for every foot of distance between posts in feet, that is the minimum height of the beam.
For example: if posts are 8' apart and you are using 4x4 posts, the beams should be 4x8's. If the posts are 12' apart and you are using 6x6 posts, then the beams should be at least 6x12's. This has always worked for me. However, the code can be less forgiving. Consider using these rules of thumb instead for 4x beams:
- 4x8: Up to 6'2" span
- 4x10: Up to 7'10" span
- 4x12: Up to 9' 6"
For a more nuanced approach, I LOVE this chart:

If you want to be Super Safe: Don't exceed an 8' span. Likewise, another good rule of thumb is for Cantalevor. The Cantilever is how far a beam can hang over an end post, as opposed to the SPAN that is between posts. Here's the rule of thumb: It's half the span minus a foot.
Here's how it works: Say you've got a deck with 4x4 posts 10' apart... so you'd be using 4x10 beams and they can hang over the end post a maximum of (10'/2) -1= 4'.
Joists and Blocking:
So: I probably should have started this blog by saying that Joists go 90° to the decking and the decking is usually parallel to the house, door, or view... and the beams are 90° from the joists... so really you start your deck design with this orientation in mind.
Again, we're talking about class #2 HemFir... Pressure Treated Douglas Fir framing. Here the spacing is determined by the decking. Usually, minimum joist spacing for most "composite" decking is 16". 16" spacing is the norm, but I've seen 12" for 2nd story decks. Here's some rules of thumb for Joist Spans with a 16" spacing:
- 2x6: Max span is 7' 6" (I like to say 6')
- 2x8: Max span is 9'10" (I like to say 8')
- 2x10: Max span is 12'6" (I like to say 10')
- 2x12: Max span is 15'4" (I like to say 12')
Blocking:
"Solid Blocking" should go on top of the beams between the joists. They alternate so you can easily screw them to the joists. If there is a single beam and it's more than 6' from the ledger, I like to see blocking half way between them as well:
 Ledgers, Rim Joists, and Facia:
Ledgers are, along with stair design, the trickiest part of deck design as it gets into the home construction, flashing, and weather-proofing. Here's the deal: The Ledger attaches the deck to the structure -Firmly while protecting the connection from moisture. For this reason, I like the Deck 2 Wall Spacers as they hold the Ledger off the structure and allow some air flow. Details will vary depending on where on the structure the connection takes place and what kind of wall framing exists.
Usually, under the siding and weather-proofing, at the end of the floor joists there will be a "Band Joist". The rule of thumb is that you need to attach the deck Ledger to the Band Joist at at least two places and a minimum of every 8' with two connectors: a bottom 1/2" HDG bolt, AND, bypassing the Band Joist and Ledger, connect the Flooring Joists and the Deck Joists with a DTT2Z Deck Tie fastener or similar hold down These should be within 2' of each end of the deck. THEN, in addition, you need to connect the Ledger to the Band Joist... either with 1/2" HDG lag screws at the following spacing:
- Joist Span: 6': 30" O.C.
- Joist Span: 8': 23" O.C.
- Joist Span: 10': 18" O.C.
- Joist Span 12': 15" O.C.
OR... if using the Deck 2 Wall Spacers, you can use Simpson Strong Drive Model SDWS22500DB.
I am not going to get into "Z Flashing" and weather proofing here. Please look at your local code for a good detail such as these:


And again, for more nuance, the fasteners could also use this chart:

Rim Joists & Deck Railing Posts... really are integral.
Generally, the Rim Joist is the same as the Joist material. Deck Railing posts may not exceed 4' O.C.. The tricky part is connecting the posts through the Rim Joists to the Deck Joists using hold downs such as the DTT2Z Deck Tie fastener or the HTT4 Tension Tie. It's a bit complicated so I'll include the best design I've seen so far, from the City of Santa Rosa:

As you can see, those posts aren't going anywhere. The bottom line is that they need to resist a force of 200 lb. load at the top of the rail, which should be 42" off the deck. Here's a few other details of this:

This leads us to...
Railings:
Railings can be wood, metal, glass, cable... so many options. The thing that is not optional, beyond the 42" height and 200 lb. strength mentioned above, is that you can NOT pass a 4" sphere through the railing at any point. This sphere represents a baby's head; that's the rule.
Some good links for pre-fabricated railing systems:
-Or you can use RWD 2x2 or even livestock panels.
Usually, for wood railings you'd use Redwood (RWD) which is S4S, or Surfaced on Four Sides. There's usually two 2x4 Stringers, one at the top and one below, and then a Cap. The cap is usually a 2x6.
Ah.... Finally the DECKING:
I'll start this off with links to Trex and Timbertech. These are the two composite decking products I have the most experience with and... with the price of good redwood as it is, coupled with its need for regular upkeep, the composite decks just make better sense. What's also cool is the ease of implementing a hidden fastener system such as the Trex Universal Fastener.
Remember: these products need the joists to be a maximum of 16" O.C.
Working with the different colors and Facia boards you can have some fun with a deck design.
Tip: If you're going old school and using 2x6 boards, drop 16 penny nails between the boards as you screw them to the joists; this leaves you with the perfect spacing (Yes you NEED spacing between the deck boards.)
Well, folks, Stairs and other amenities will have to wait for another blog... or a course. If you're down here reading this, THANK YOU! I hope you liked it and you can use the info and links.
Please let me know in the comments if you like other products I didn't mention of if you have any other "rules of thumb" that would make deck design Super Simple.
source for some of the charts: Alter Eagle Construction
Do you like this kind of blog? Want more? Please consider getting on my e-mail list. No spam. Ever. I promise. Just good landscape stuff.
